
[ad_1]
Introduction
Excessive-fidelity simulation is more and more essential throughout the improvement of robots and robotic functions. Digital environments with photo-realistic objects, and robotic fashions with correct physics are important for creating and testing robots that carry out reliably on refined duties within the bodily world. Organising a high-fidelity simulation, coaching, and testing setting, nonetheless, poses challenges. Putting in and configuring simulation instruments takes time and experience, and correct reasonable simulations demand vital computing, community, and storage assets. Exactly repeating and scaling simulations and exams throughout distributed groups can also be difficult.
This weblog offers a tutorial to deal with these challenges, displaying the best way to orchestrate NVIDIA Isaac Sim and ROS 2 Navigation on AWS RoboMaker, a cloud-based simulation service that permits robotics builders to run, scale, and automate simulation, utilizing a container picture from the Amazon Elastic Container Registry (ECR) Public Gallery. The NVIDIA Isaac Robotics Platform offers trade main simulation photo-realism, with a excessive efficiency open supply physics engine (NVIDIA PhysX), which makes it supreme for robotic simulation.
Answer overview
AWS RoboMaker is a completely managed service for working simulations at scale within the cloud with no need to provision servers or networks. AWS RoboMaker additionally helps working containers primarily based on photos from public container registries, together with the Amazon ECR Public Gallery. NVIDIA has printed an Isaac Sim picture to the Amazon ECR Public Gallery, to be used with AWS RoboMaker.
NVIDIA Isaac Sim is a scalable robotics simulation software and artificial data-generation software that powers photorealistic, bodily correct digital environments, and ROS 2 Navigation is a stack that permits a cellular robotic to maneuver and full advanced duties in lots of kinds of environments. Operating the NVIDIA public container photos on AWS RoboMaker within the cloud gives many benefits. Robotic builders can launch highly effective simulation and coaching environments in a matter of minutes somewhat than days and faucet almost limitless assets, paying just for what’s wanted. Groups also can obtain consistency and standardization by utilizing a standard set of containers.
The tutorial beneath explains the best way to run a high-fidelity robotic simulation utilizing NVIDIA Isaac Sim and ROS 2 Navigation as containerized simulation and robotic functions on AWS RoboMaker. The tutorial steps embody launching an AWS RoboMaker Simulation from the Amazon ECR Public Gallery containing the NVIDIA instruments and interacting with the instruments by way of AWS RoboMaker. The instance within the tutorial drives a Carter robotic by a simulated warehouse setting utilizing the ROS bundle RViz. An structure diagram depicting how the simulation is ready up is proven beneath. The AWS RoboMaker simulation job makes use of a simulation software to orchestrate the simulation setting (Isaac Sim), and a robotic software to orchestrate the robotic navigation software program (ROS 2 Navigation), every primarily based on a separate container, enabling modularity, repeatability, and suppleness. Logs from each functions are aggregated by AWS RoboMaker in Amazon CloudWatch.
Tutorial

AWS Structure to orchestrate NVIDIA Isaac Sim and ROS 2 Navigation containers on AWS RoboMaker
Conditions
- An AWS Account
- A person or function with permissions to create and run AWS RoboMaker simulation jobs and to create and retailer Amazon Elastic Container Registry (ECR) photos
- A improvement setting with the AWS CLI put in, or an AWS Cloud9 setting
Tutorial overview
The tutorial consists of the next steps:
- Step 1: Construct the Docker picture for the AWS RoboMaker robotic software
- Step 2: Create and launch the AWS RoboMaker simulation job
- Step 2a (Non-compulsory): Export a simulation JSON file to launch simulations by way of the AWS CLI
- Step 3: Load a simulation setting within the simulation software
- Step 4: Load and run navigation with RViz within the robotic software
Step 1: Construct the Docker picture for the AWS RoboMaker robotic software
This step offers particular directions on the best way to construct the Docker picture for the AWS RoboMaker robotic software in a Linux setting, however you possibly can construct the picture in different environments with the information offered beneath. The picture accommodates ROS2 Cunning and the NVIDIA carter_navigation bundle, together with NICE DCV, OpenGL, and the vim and nano editors.
Within the improvement setting with the AWS CLI put in, from the Linux command line immediate, create a brand new working listing within the location of your selection by coming into the next:
mkdir docker && cd dockerCreate a file named Dockerfile within the docker listing with the next contents:
FROM osrf/ros:foxy-desktop

ENV DEBIAN_FRONTEND=noninteractive

RUN apt-get replace && apt-get set up -y xterm python3-rosdep python3-rosinstall python3-rosinstall-generator python3-wstool build-essential python3-colcon-common-extensions ros-foxy-navigation2 ros-foxy-nav2-bringup ros-foxy-turtlebot3*

# set up NICE DCV (for RoboMaker)
RUN apt-get replace -y && apt-get improve -y && apt-get set up -y wget pgp
RUN wget https://d1uj6qtbmh3dt5.cloudfront.web/NICE-GPG-KEY
RUN gpg --import NICE-GPG-KEY
RUN wget https://d1uj6qtbmh3dt5.cloudfront.web/nice-dcv-ubuntu2004-x86_64.tgz
RUN tar -xvzf nice-dcv-ubuntu2004-x86_64.tgz
RUN apt-get replace && apt-get set up -y ./nice-dcv-*/nice-dcv-gl*.deb

# set up opengl
RUN apt-get replace && apt-get set up -y libglfw3 libglfw3-dev libnss3

# set up vim and nano
RUN apt-get replace && apt-get set up -y vim nano

#Construct ROS2 Challenge for Carter navigation
RUN git clone https://github.com/NVIDIA-Omniverse/IsaacSim-ros_workspaces/
RUN mkdir -p /isaac-sim/ros2_workspace/
RUN cp -r IsaacSim-ros_workspaces/foxy_ws/* /isaac-sim/ros2_workspace/
RUN rm -rf IsaacSim-ros_workspaces/
WORKDIR /isaac-sim/ros2_workspace
SHELL ["/bin/bash", "-c"]
RUN apt-get replace -y && apt-get improve -y
RUN supply /decide/ros/cunning/setup.bash && rosdep set up -i --from-path src --rosdistro cunning -y && colcon construct

# Add the appliance supply file to the entrypoint.
WORKDIR /
COPY entrypoint.sh /entrypoint.sh
RUN sudo chmod +x /entrypoint.sh
ENTRYPOINT ["/entrypoint.sh"]
Create a file named “entrypoint.sh” within the “docker” listing with the next contents:
#!/BIN/BASH
SET -E
SOURCE "/OPT/ROS/FOXY/SETUP.BASH"
SOURCE "/ISAAC-SIM/ROS2_WORKSPACE/INSTALL/LOCAL_SETUP.BASH"
PRINTENV
EXEC "${@:1}"
From the command immediate within the “docker” listing construct the robotic software picture by coming into the next:
sudo docker construct -t isaac-ros:newest .Create a brand new Amazon ECR repository by coming into the next:
aws ecr create-repository --repository-name isaac-rosSave the repositoryUri output from the earlier command in an setting variable for future use by coming into the next:
REPOSITORY_URI=<repositoryUri>Authenticate to the newly created Amazon ECR by coming into the next:
aws ecr get-login-password | sudo docker login -u AWS --password-stdin $REPOSITORY_URITag the Docker picture by coming into the next:
sudo docker tag isaac-ros:newest $REPOSITORY_URI:newestPush the Docker picture to the Amazon ECR by coming into the next:
sudo docker push $REPOSITORY_URI:newestStep 2: Create and launch the simulation job
AWS RoboMaker simulation jobs are primarily based on working a simulation software and an non-compulsory robotic software, that are primarily based on container photos saved in Amazon ECR.
From the AWS RoboMaker menu, select Simulation jobs beneath Simulation run within the left-hand navigation pane after which select Create simulation job:

Configure the next for Step 1, Configure simulation, leaving the remaining inputs set to the defaults:
- Select Create new function from the IAM function drop-down and enter a Identify for the function, similar to
isaac - Select CPU and GPU from the Compute kind drop-down
- From the VPC drop-down within the Networking part, select a VPC containing two or extra public subnets, for instance your default VPC. The NVIDIA containers want web entry for loading instance property.
- From the Safety teams drop-down within the Networking part, select a safety group that permits outbound TCP visitors on ports 80 and 443 to permit the container to load NVIDIA instance property.
- From the Subnets drop-down within the Networking part, select no less than two subnets.

- Select Subsequent on the backside of the web page.
For documentation on creating and modifying VPCs, public subnets, and safety teams, please seek advice from the Amazon VPC Person Information.
Configure the next for Step 2, Specify robotic software, leaving the remaining inputs set to the defaults:
- From the Select technique part select Create new software
- Within the Robotic software part,
- Present a reputation similar to
ros-2-navigation - Within the Container picture sub-section, be sure that the Non-public radio button is chosen and enter the next URI for the ROS 2 Navigation picture you created, substituting the repository URI from the above Step 1: Construct the Docker picture for the AWS RoboMaker robotic software:
<repositoryUri>:newest
- Present a reputation similar to
- Within the Robotic software configuration part,
- Enter the next into the Launch command area
ros2, launch, carter_navigation, carter_navigation.launch.py - Ensure that the Run with streaming session checkbox is chosen

- Enter the next into the Launch command area
- Increase the Robotic software instruments part and select Customise instruments.
- Select Add software and enter the knowledge indicated beneath:
- Enter
robot-app-terminalfor Device Identify - Enter
/usr/bin/xterm -geometry 120x40for Command - Select Restart from the Exit habits drop-down
- Select Allow UI Streaming for Output settings
- Ensure that the Ship output to Amazon CloudWatch checkbox is chosen

- Select Add software
- Enter
- Select Subsequent on the backside of the web page.
Configure the next for Step 3, Specify simulation software, leaving the remaining inputs set to the defaults:
- From the Select technique part select Create new software
- Within the Simulation software part,
- Present a Identify as
isaac-sim - Within the Container picture sub-section, select the Public radio button and enter the next URI for the NVIDIA Isaac Sim public picture:
public.ecr.aws/nvidia/isaac-sim-robomaker:newest
- Present a Identify as
- Within the Simulation software configuration part,
- Enter the next into the Launch command area
/isaac-sim/isaac-sim.sh --allow-root - Ensure that the Run with streaming session checkbox is chosen
- Enter the next into the Launch command area
- Within the Atmosphere variables part, select Add merchandise
- Enter
ACCEPT_EULAfor Identify - Enter
Yfor Worth
- Enter
- Increase the Simulation software instruments part and select Customise instruments.
- Select Add software and enter the indicated info for the next fields:
- Enter
simulation-app-terminalfor Device title - Enter
/usr/bin/xterm -geometry 120x40for Command - Select Restart from the Exit habits drop-down
- Select Allow UI Streaming for Output settings
- Ensure that the Ship output to Amazon CloudWatch checkbox is chosen

- Select Add software
- Enter
- Select Subsequent on the backside of the web page.
On the Evaluate and create simulation job web page, scroll right down to the underside and select Create. It might take 5-10 minutes for the standing of the job to transition to Operating. Proceed to Step 3 as soon as the simulation job is within the Operating state.
For extra particulars on different choices when creating AWS RoboMaker simulation jobs, please seek advice from the AWS RoboMaker Developer Information.
Step 2a (Non-compulsory): Export a simulation JSON file to launch simulations by way of the AWS CLI
Whereas the job is launching, you possibly can export a JSON file that can be utilized with the AWS CLI aws robomaker create-simulation-job command to launch simulations from the command line.
First, copy the job ARN by selecting the copy icon to the left of the ARN within the Particulars part of the simulation job:
From a terminal enter the next command, changing <JOB ARN> with the ARN copied above:
aws robomaker describe-simulation-job --job <JOB ARN> >> launch-simulation.json
Now you can edit this JSON file as desired and launch related simulations from the command line with a command like:
aws robomaker create-simulation-job --cli-input-json file://<path to the JSON file>For extra particulars on launching AWS RoboMaker simulations from the command line, please seek advice from the AWS RoboMaker Developer Information.
Step 3: Load a simulation setting within the simulation software
On this step, you’ll run NVIDIA Isaac Sim within the simulation software on AWS RoboMaker. You’ll be able to proceed with the next steps as soon as the simulation job launched in Step 2 is within the Operating state.
- If you happen to’re not already on the simulation particulars web page, select the ID hyperlink for the working simulation job.

- Select Join on the Simulation software software – it will launch the Isaac Sim UI.

- Resize the pop-up browser window to fill your total display. If you happen to see the message “RTX Loading”, please wait till it disappears, which might take a number of seconds.
- From the Isaac Sim UI high menu, select Isaac Examples > ROS > Navigation. The instance might take a couple of minutes to load.

- When the high-resolution navigation instance is loaded select the Play button on the left of the Isaac Sim UI.
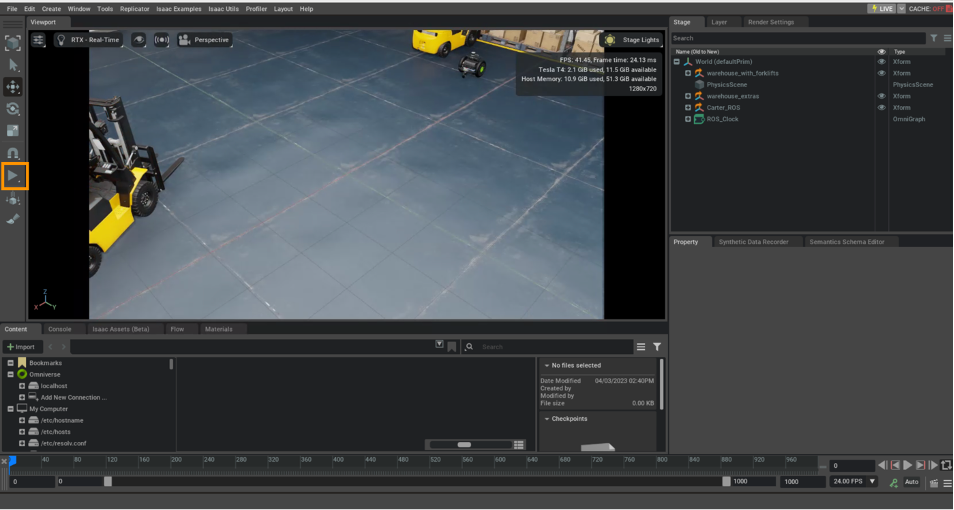
- You need to see the angle change to a first-person view from the robotic, dealing with a shelf with bins.

Step 4: Load and run navigation with RViz within the robotic app
On this step, you’ll navigate the NVIDIA Carter robotic utilizing RViz.
- From the AWS RoboMaker simulation element web page, select Join on the Robotic software software.

- Resize the pop-up browser window displaying RViz to fill your display once more:

- Select the Navigation2 Aim button on the high after which click on and drag the mouse on the desired location within the map to set the goal place and pose for the robotic to navigate to. ROS 2 Navigation (Nav2) will now generate a trajectory, and the robotic will begin shifting in direction of its vacation spot. You’ll be able to observe the Isaac Sim UI to see the robotic shifting from the first-person perspective in NVIDIA Isaac Sim within the AWS RoboMaker simulation app.
To be taught extra about the best way to use NVIDIA Isaac Sim, please seek advice from the tutorials within the NVIDIA Isaac Sim overview. You need to use the xterm software within the AWS RoboMaker robotic app to carry out command line duties described within the tutorials. (Since Isaac Sim is already working on AWS RoboMaker with ROS 2 Cunning, you don’t have to carry out the set up steps within the tutorials.)
Cleansing up
If you’ve accomplished the tutorial, take away any assets you created to keep away from incurring further prices:
- From the simulation job element web page, select Cancel from Actions drop down, after which select Proceed.
- Delete the robotic and simulation functions
- Delete the AWS IAM function created in step 1 of this tutorial
- Delete the Amazon ECR repository
Conclusion
On this weblog you might have discovered the best way to run high-fidelity simulations utilizing NVIDIA Isaac Sim and ROS 2 Navigation on AWS RoboMaker, leveraging the brand new functionality to load container photos, together with one from a public repository, into AWS RoboMaker. Operating simulations within the cloud utilizing pre-packaged container photos saves time organising the delicate instruments for high-fidelity simulation. As well as, it offers a really cost-effective solution to faucet the appreciable compute, storage, and networking assets required to run reasonable simulations, paying for under what you utilize. Lastly, containers can promote standardization throughout groups, growing effectivity and repeatability within the design and testing phases. If you want to be taught extra about how you should utilize NVIDIA instruments on AWS RoboMaker to advance your robotics improvement or simulation efforts, please attain out to the authors or contact your account staff.

Shaun Kirby
Shaun Kirby is a Principal Buyer Supply Architect at AWS, specializing within the Web of Issues (IoT). He helps prospects excel with cloud applied sciences, diving deep into their challenges and alternatives to pioneer recreation altering options throughout industries. Previous to AWS he led fast prototyping and an IoT showcase at Cisco. He’s a trusted advisor to know-how executives, with roots in giant scale methods structure and integration. Shaun is captivated with how robotics can carry breakthrough enhancements within the high quality of life.

Abhishek Srivastav
Abhishek Srivastav is a Senior Options Architect at AWS. He’s captivated with enabling prospects to speed up their cloud adoption. He’s an IoT fanatic and holds deep experience in NoSQL databases, analytics, and AI/ML applied sciences. He’s captivated with discovering solutions to advanced issues by drawing on his in-depth understanding of those applied sciences. He has held lead positions for NoSQL Middle of Excellence roles at numerous enterprise prospects previous to becoming a member of AWS.

Matt Hansen
Matt Hansen is a Principal Options Architect at AWS Robotics. Matt has a few years of expertise with robotics, particularly with ROS, ROS 2 and cloud robotics options. Since 2020 Matt has been with AWS Robotics, primarily targeted on cloud-based robotic simulation utilizing AWS RoboMaker. Previous to becoming a member of AWS, Matt led the event of the ROS 2 Navigation stack – Nav2, and was an authentic member of the ROS 2 Technical Steering Committee. Matt is captivated with robotics, navigation, and simulation within the cloud.
[ad_2]