
[ad_1]
74.2K
ExpressLRS is an open-source RC system that has gained recognition attributable to its affordability, ultra-low latency, and long-range capabilities. Nevertheless, establishing ExpressLRS may be fairly a frightening process for novices. That’s why on this tutorial, we’ll information you thru the method of flashing and establishing ExpressLRS 2.4GHz transmitter module and receiver on OpenTX/EdgeTX radio and Betaflight.

Among the hyperlinks on this web page are affiliate hyperlinks. I obtain a fee (at no further value to you) should you make a purchase order after clicking on one in all these affiliate hyperlinks. This helps assist the free content material for the group on this web site. Please learn our Affiliate Hyperlink Coverage for extra data.
New to ExpressLRS? This text explains some great benefits of ExpressLRS over different radio management techniques and why I favor to make use of 2.4GHz than 900MHz.
ExpressLRS 2.4GHz {Hardware} Choice
All transmitters and receivers with ExpressLRS firmware are appropriate regardless the model.
Radios with Constructed-in ELRS
Getting a radio with ExpressLRS built-in means you possibly can get pleasure from this nice radio management hyperlink with out the necessity for an extra module. It simplifies the setup course of and reduces the price of upgrading your radio system. Some radios with inner modules solely go as much as 150-250mW, whereas some might go as much as 1W.
Transmitter Module
In case you have a radio with out built-in ExpressLRS, you have to to buy an ExpressLRS transmitter module with a view to use the system. Your radio will need to have a appropriate module bay to put in this module to.

Selecting a transmitter module may appear daunting because of the abundance of choices obtainable. Nevertheless, most of them are based mostly on the identical open supply design by ExpressLRS. The principle variations lie within the construct high quality, options akin to display, most output energy, and cooling. Go for one of many respected model featured under.
The transmitter module suits into the exterior JR module bay. Smaller radios may need lite module bay, you have to to get the proper measurement module.
Different full measurement module choices:
Different Lite module choices:
TX Antenna Upgrades
Inventory antennas typically have decrease positive aspects as they’re designed for normal use, and their construct high quality is just not at all times one of the best. To extend your vary, contemplate upgrading to an aftermarket antenna with higher high quality and better acquire. With a variety of shapes and sizes, you will discover one which fits your wants and atmosphere.
Receivers
All ExpressLRS receivers and transmitter modules are cross-compatible, no matter model, since they’re based mostly on the identical open supply design. The principle variations are construct high quality, measurement, and WiFi assist for firmware updates and configuration. Lastly, contemplate the kind of antenna that comes with the receiver, as some have a built-in antenna which is extra compact, whereas others include a U.FL connector for an exterior antenna which usually present higher vary.
On the subject of {hardware}, contemplate receivers with “PA” and “LNA” for higher vary efficiency. Search for receivers with “TCXO” as they provide a extra steady hyperlink.
PA (Energy Amplifier) and LNA (Low-Noise Amplifier) are parts that enhance the efficiency of the receiver. The PA offers a extra strong telemetry hyperlink for long-range flying, whereas the LNA considerably will increase the sensitivity of the receiver and offers you higher vary.
TCXO (Temperature Compensated Crystal Oscillator) is a sort of oscillator that gives a much more steady frequency with a a lot wider temperature vary. That is necessary as a result of when parts warmth up or settle down, it could actually trigger frequency shift within the oscillator, and if that frequency shift is exterior of a sure margin, your receiver will lose reference to the transmitter. So, having a receiver with a TCXO will guarantee optimum efficiency and reliability.
Range Receivers
Range gives higher vary and sign energy. There are two sorts of variety receivers. “Antenna Range” makes use of a single radio chip related to 2 antennas, whereas “True Range” makes use of 2 unbiased RF chips, every with its personal antenna. True Range is costlier than Antenna Range, however makes simpler use of the dual-antenna setups subsequently offers higher efficiency. True variety receivers additionally assist Gemini Mode. Extra data on Range Receivers.
PWM Receivers
Different receiver choices:
RX Antenna Substitute
Is It Essential to Replace ExpressLRS Firmware?
You don’t must however it is best to.
With every replace, the open-source undertaking offers bug fixes and efficiency enhancements, guaranteeing optimum performance.
ELRS firmware model makes use of a three-part quantity system: A.B.C
- A: main model quantity
- B: minor model quantity
- C: patch quantity
All releases with the identical main model quantity are cross-compatible, however not with completely different main variations. As an illustration, 2.0 will work with 2.1, 2.2, 2.5 and so on, however 2.x firmware received’t bind with 3.x.
Flash EdgeTX

In case you have OpenTX in your radio, contemplate flashing EdgeTX. EdgeTX is a more recent, extra cutting-edge fork of OpenTX with frequent updates and plenty of extra options. Plus, it gives particular advantages to be used with ExpressLRS, akin to 500Hz gimbal polling. Take a look at our information for flashing EdgeTX to your radio.
If wish to proceed to make use of OpenTX, ensure you replace to 2.3.12 or newer earlier than making an attempt to flash ELRS firmware to your transmitter module (the brand new variations assist CRSFShot which is important for ELRS to work). Our step-by-step information for flashing OpenTX may help you get began.
Easy methods to examine whether or not you’ve gotten OpenTX or EdgeTX on the radio? Press the “SYS” button, then press the PAGE button till you’re on the final web page “VERSION”, and you’ll see the firmware and model there.

Obtain ExpressLRS Configurator
ExpressLRS Configurator permits you to construct, compile and flash firmware for the ExpressLRS receivers and transmitter module.
Obtain: https://github.com/ExpressLRS/ExpressLRS-Configurator/releases/newest
For Home windows, click on the hyperlink with this title: ExpressLRS-Configurator-Setup-X.X.X.exe
Your pc have to be related to the web whereas utilizing the Configurator.

Set up LUA Script
A LUA script is a mini program on the radio. The ExpressLRS LUA script permits you to configure the system, akin to altering radio hyperlink settings, activating binding mode, enabling WiFi and so on.
EdgeTX usually comes with ExpressLRS LUA script and also you don’t must do something. Nevertheless once you replace ExpressLRS, it’s a good suggestion to replace the LUA script as nicely.
You will discover and open the LUA script by urgent the SYS button, and choose “ExpressLRS”.

If the LUA script is just not there, you possibly can obtain it within the ExpressLRS Configurator by choosing the newest launch model and any goal, and the “Obtain LUA Script” button will seem.

The downloaded file ought to have “.lua” file extension, put that file on this listing in your radio’s SD card: SCRIPTSTOOLS

Earlier than continuing, it’s a must to get your radio speaking to the ExpressLRS TX module (let it’s inner module or exterior module). In your radio, go to Mannequin setup, scroll all the way down to “Inner RF” and choose “CRSF” in Mode. In case you have an exterior module, do that beneath “Exterior RF” and depart Inner RF to OFF. No want to vary any of the choices.
If yours is a brand new radio and also you’ve by no means setup a mannequin profile earlier than, I encourage you to check out how you can make a mannequin profile from scratch: https://oscarliang.com/create-new-model-profile-edgetx/

Determine {Hardware} and Firmware Model
There are a lot of producers making receivers and transmitter modules for ExpressLRS. You must know the model and mannequin of the {hardware} with a view to flash the right firmware. Flashing the incorrect firmware will fail the method, it would even brick your gadget.
The simplest solution to examine is by going to the WiFi webpage. Right here’s how you can do it.
Firstly, allow WiFi in your gadget by going to the ExpressLRS LUA script, choose WiFi Connectivity.

Then allow WiFi on the specified gadget.

For receivers, it’s also possible to simply wait 60 seconds with out turning in your transmitter, and it’ll go into WiFi mode routinely.
In your laptop computer, it is best to see a WiFi community known as ExpressLRS TX (or ExpressLRS RX). Hook up with this community, the password is expresslrs.

Open the browser, and kind 10.0.0.1 within the tackle bar, it’s going to open up an internet site which can let you know which firmware goal it’s utilizing. You can too examine the firmware model right here.

When you beforehand setup the gadget to hitch your house WiFi community, then you definitely received’t see this WiFi community. As an alternative, keep related to your house WiFi, and enter http://elrs_rx.native/ or http://elrs_tx.native/ within the browser tackle bar.
Alternatively, for ELRS transmitter modules, it’s also possible to discover the maker, mannequin and firmware model within the LUA script (on the prime and backside of the web page). For receivers, go to “Different Units” within the LUA script, and click on on the receiver, firmware model needs to be displayed there (solely works since V3).

Compile and Flash TX Firmware
You may flash the TX module utilizing one in all these strategies:
I discovered WiFi to be the simpler and extra dependable technique, I’ll display how you can do it right here. You can too use USB which I’ll clarify shortly later.
Constructing ELRS TX Firmware
Earlier than flashing, you could compile the firmware first utilizing the ExpressLRS Configurator.

Beneath Releases, select the newest firmware.
Beneath Machine Goal, choose the model, and gadget. On this instance, I’ve the BetaFPV Micro 1W TX, so the Goal Machine alternatives could be:
- Machine Class: BetaFPV 2.4 GHz
- Machine: BetaFPV 2400 TX Micro 1000mW
Let me clarify what among the settings imply.
Regulatory Domains – relying on the place you’re, the second choice “EU_CE” is for folks within the EU, that is also referred to as LBT. Anyplace else you possibly can choose the primary choice “ISM”, also referred to as FCC.
What’s FCC and LBT and the way does it have an effect on efficiency?
FCC (Federal Communications Fee) and LBT (Pay attention Earlier than Discuss) are regulatory requirements for radio techniques. FCC is globally accepted, whereas LBT is restricted to Europe and requires a radio to examine for different transmissions earlier than transmitting itself. Whereas FCC usually permits for constant energy output, LBT might cut back output energy attributable to its “hear” requirement, probably affecting efficiency.
Binding Phrase – it’s like the important thing to your automobile, be artistic and make a novel phrase, so folks you fly with don’t by accident use the identical phrase and trigger issues. Notice that different folks CAN management your drone in the event that they use the identical binding phrase.
Community => Auto WiFi On Interval: what number of seconds it activates WiFi mode if no radio hyperlink is established. Default is 60 however I personally favor to set it to twenty. If the receiver goes into WiFi mode you simply must unplug LiPo and plug in once more.
Community => HOME_WIFI: See right here for extra element.
The Configurator remembers your selections, so that you don’t want to pick them once more the following time.
Flash TX Firmware by way of WiFI
As soon as you’re proud of the firmware choices, choose WiFi beneath Flashing technique.
Click on the BUILD button (NOT Construct and Flash) to compile the firmware. It may well take a number of minutes relying in your web velocity.
When it’s performed, a home windows ought to pop up containing the firmware file, named “firmware.bin“.

Plug within the TX module to your radio module bay and energy on radio.

In your radio, setup a brand new mannequin profile, in Mannequin Setup, beneath Exterior RF, choose CRSF in Mode. In case your module is an inner module (i.e. constructed into the radio), then you could choose CRSF beneath Inner RF.

Open the LUA script by urgent the SYS button, beneath Instruments, choose ExpressLRS.
Choose “WiFi Connectivity“.
Choose “Allow WiFi” and depart the radio powered on.
Go to your pc’s WiFi, it is best to discover a new community known as “ExpressLRS TX Module“. The WiFi password is: expresslrs
Open browser and go to 10.0.0.1

Click on “Select File” and choose “firmware.bin” generated from the ExpressLRS Configurator earlier.
Click on Replace. That’s it!
Flash TX Firmware by way of UART/USB
You should use the USB port on the TX module to flash firmware.
You may want to put in CP210x Driver (Obtain: https://www.silabs.com/builders/usb-to-uart-bridge-vcp-drivers). I attempted customary home windows driver because it comes with an installer, model 6.7.6 appears to work positive.
This course of will work for nearly any ExpressLRS transmit module. On some newer modules, you possibly can simply plug within the USB cable and it’ll flash right away. Nevertheless some older modules have dip switches, you could put them in the proper place with a view to flash. Seek the advice of the handbook should you see these switches. For instance the BetaFPV Micro TX module has these dip switches.

Plug within the USB cable to the TX module, a brand new COM port ought to seem in your pc.
Within the ExpressLRS Configurator, beneath Flashing technique, choose UART. When you find yourself prepared, click on the BUILD and FLASH button (not Construct). The flashing will take a couple of minutes.
Join ELRS Receiver to FC
Right here’s the pin-out of the PP, EP1 and EP2 receivers.
Join TX and RX pins to any spare UART in your flight controller. DO NOT use soft-serial as a result of it’s too sluggish.
Join TX to RX, and RX to TX.


Construct and Flash RX Firmware
For receivers with WiFi built-in, you possibly can flash firmware by way of WiFi, identical to flashing the TX. However personally I discovered utilizing Betaflight Passthrough simpler for flashing RX, and I’ll display it right here.
Open ExpressLRS Configurator, choose the identical firmware model as your TX module and select the gadget goal based mostly on the model and receiver sort. For instance:
- For PP receiver, the Machine is: HappyModel PP 2400 RX
- For EP1 and EP2 receivers, the Machine is: HappyModel EP 2400 RX
Be sure to set the binding phrase as your TX, your RX will simply bind with the TX routinely after flashing firmware. When you don’t set a binding phrase, you possibly can bind it manually as described right here.

Flash RX Firmware by way of Betaflight Passthrough
Earlier than continuing, ensure that to configure Betaflight first as described on this part.
Now join the USB cable to your quad to energy the FC and RX.
In ExpressLRS Configurator, select the COM port of the FC (if undecided, examine the COM port in Betaflight Configurator, however bear in mind to disconnect/shut it afterwards).
Hit BUILD & FLASH. It is going to take a couple of minutes.
Flash RX Firmware by way of WiFi
Principally the steps are the identical as flashing the TX module by way of WiFi. Some receivers don’t have WiFi functionality, so ensure you examine earlier than continuing.
Within the ExpressLRS Configurator, hit the BUILD button to compile the firmware.bin file.
By default, should you energy the receiver with out turning on the radio, after 60 seconds it’s going to enter WiFi mode (LED can be flashing quickly to point that). The RX’s WiFi sign is pretty weak so place the RX near the WiFi antenna to your pc.
Hook up with the WiFi community “ExpressLRS RX“. The WiFi password is: expresslrs
Go to 10.0.0.1 in your browser, and add the firmware file.
Flash RX Firmware by way of UART
Within the uncommon occasion, if neither of the above strategies work, you possibly can attempt UART flashing as described right here.
Flashing RX by way of FDTI
If for no matter motive you bricked your RX, which might occur should you misplaced energy or connection throughout flashing, you possibly can convey it again by flashing by way of FDTI: https://www.expresslrs.org/2.0/quick-start/receivers/hmep2400/#flashing-via-ftdi.
Flashing SPI ExpressLRS Receiver
Some whoop flight controllers have ELRS receiver built-in on the identical board, and it usually makes use of SPI connection as an alternative of an UART connection. instance could be the Happymodel X12 AIO 5in1 FC within the Mobula7 ELRS Version.
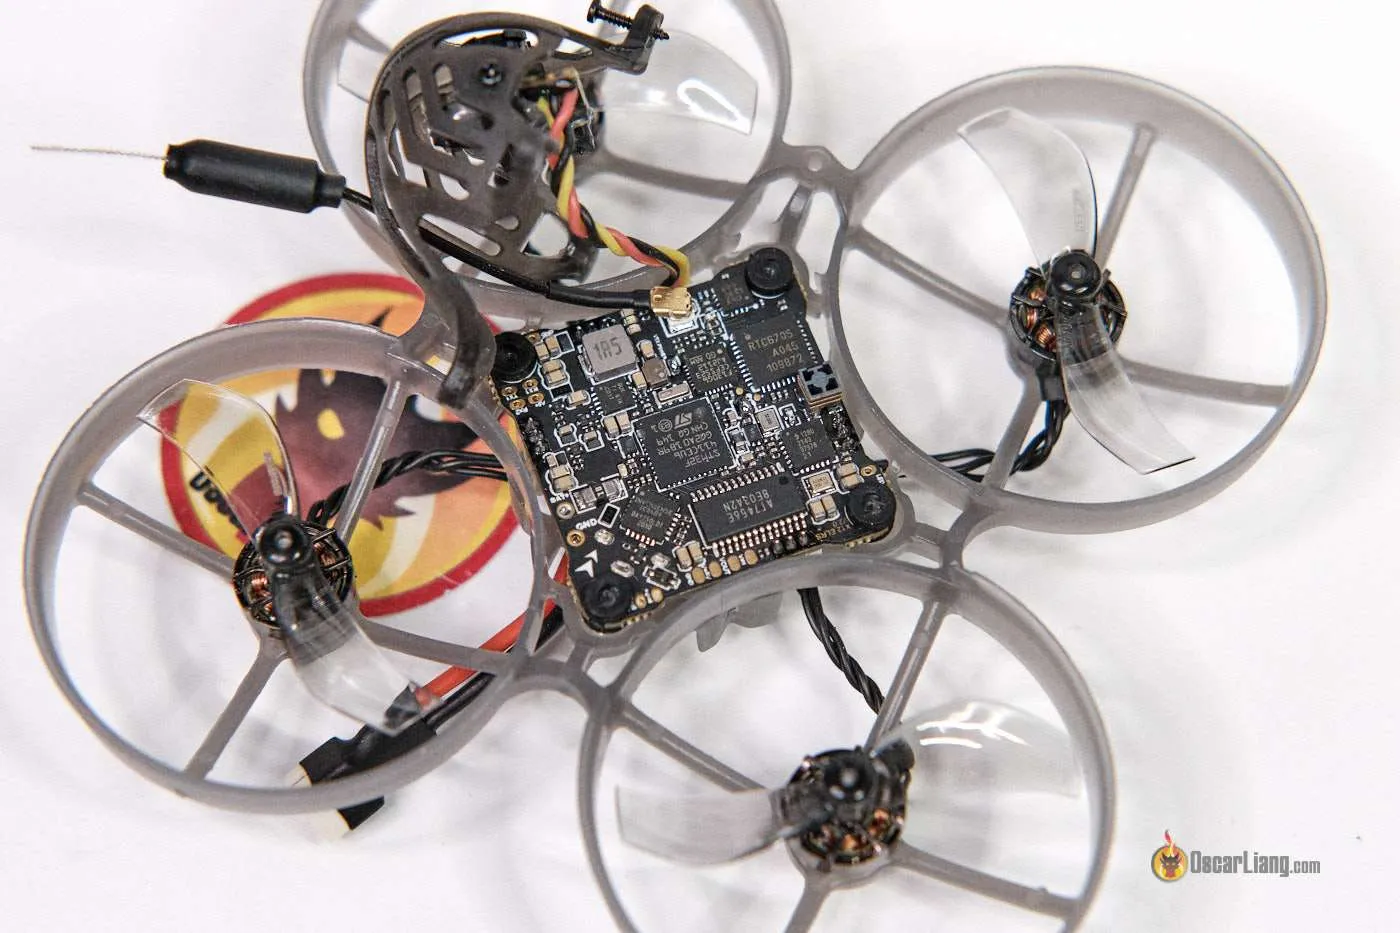
The nice factor is that you simply don’t want to fret about wiring because the receiver is simply a part of the flight controller.
However flashing the receiver is a bit difficult. In an effort to replace the RX firmware, it’s a must to flash the newest Betaflight firmware, as a result of ExpressLRS firmware is embedded within the Betaflight firmware for that flight controller. All of the construct choices (akin to area, change mode and so on) are in Betaflight CLI (sort “get expresslrs” will checklist all of them).
To examine when you have a SPI ELRS receiver, merely go to Betaflight Configurator, Receiver tab, and see if it’s set to SPI RX / ExpressLRS.

Binding Receiver
There’s no bind button on ELRS receivers (if there’s a button, it’s the boot button). There are 3 methods to bind your receivers to a transmitter as defined on this tutorial: https://oscarliang.com/bind-expresslrs-receivers/
ExpressLRS transmitter and receiver may be sure utilizing bind phrase, which you’ll be able to set when compiling the firmware to your gadgets, or you possibly can enter this within the Net UI. Each receiver and transmitter will need to have the identical binding phrase to work.
When the receiver first powers up, it appears for the transmitter with the matching binding phrase. As soon as the connection is established it’s going to get synced up, and one other gadget received’t be capable to hook up with it.
Nevertheless if another person makes use of the identical bind phrase on their radio and has a stronger sign than you, it’s potential your receiver will bind to theirs first, they usually can take management of your quad. This is able to be a particularly uncommon state of affairs and even when somebody desires to do that on goal it will be very exhausting to drag off, nonetheless, it’s finest should you maintain your bind phrase a secret and as distinctive as potential.
You can too bind a transmitter and receiver manually by placing them in Bind Mode. However this may solely work if the receiver doesn’t have a bind phrase set.
Receiver LED Standing Indicator
Monochrome LED that means:
- Stable LED means bind efficiently or connection established
- Double-flash means it’s in bind mode
- Flash slowly means ready for TX module connection
- Flash quick means it’s in WIFI hotspot mode, you possibly can hook up with the RX’s WiFi community to improve RX firmware by visiting 10.0.0.1 in your browser (password: expresslrs)
- Triple blink then pause – Mannequin Mismatch (ensure that Mannequin Match is both disabled on each TX/RX, or the ID are the identical at each ends)
Coloration RGB LED that means:
- Rainbow fade impact: Beginning up
- Inexperienced heartbeat: Net replace mode enabled
- Gradual blink: Ready for connection from transmitter
- Crimson speedy flashing: Radio chip not detected
- Orange double blink then pause: Binding mode enabled
- Orange triple blink then pause: Linked to transmitter, however mismatched model-match configuration
- Stable single colour: Linked to a transmitter, colour signifies packet charge and mode
Betaflight Setup for ExpressLRS Receiver
To setup ExpressLRS RX’s:
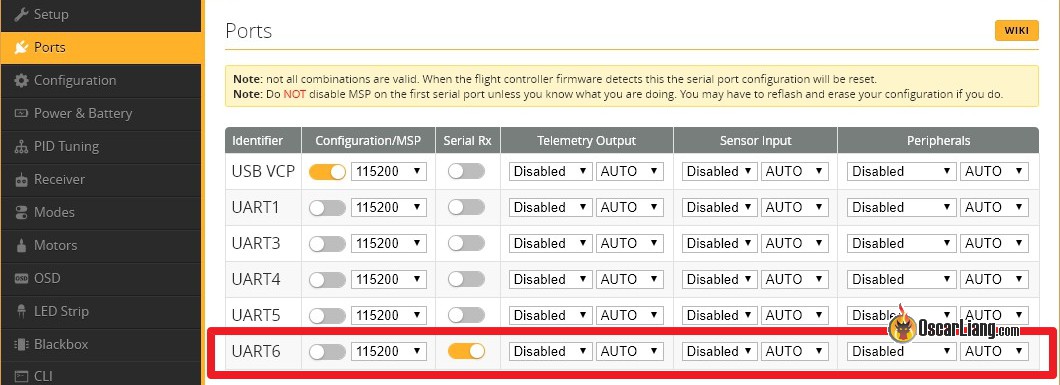
Go to the “Ports” tab within the Betaflight configurator, and allow “Serial RX” for the UART you’ve related the ELRS receiver to. Press “Save”.
Within the Receiver tab, beneath the “Receiver” Part, choose “Serial (by way of UART)“ because the Receiver Mode, and choose “CRSF” in Serial Receiver Supplier. Allow “Telemetry”, and click on the “Save” button.
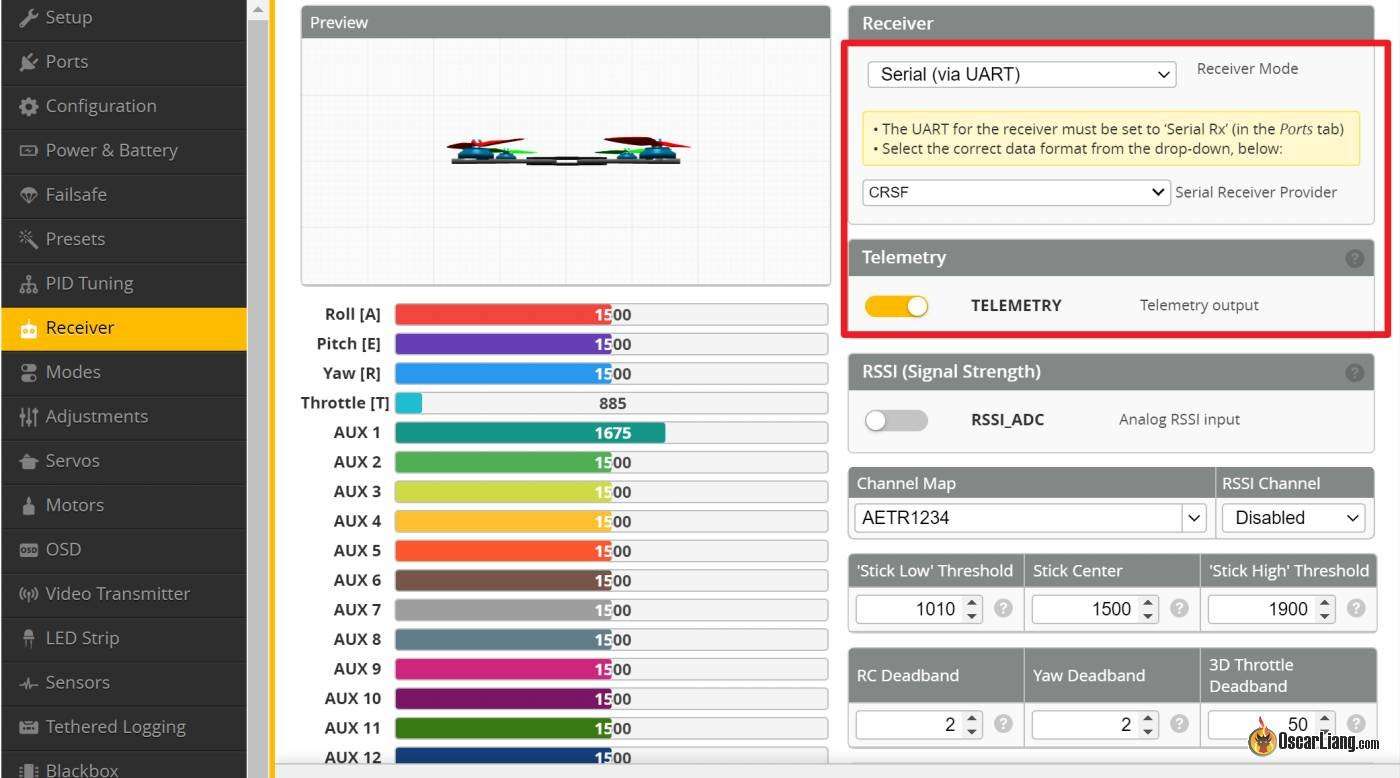
Your RX needs to be working now.
To confirm, return to the “Receiver” tab, it is best to see response from stick motion. If the channels are within the incorrect order, simply attempt a unique “Channel Map”.

Verify if the top factors (1000 or flippantly decrease / 2000 or flippantly greater) and mid factors (1500) are appropriate, see this information on how you can regulate in the event that they aren’t appropriate.
To verify Telemetry is working, go to the Telemetry web page within the radio, and choose the choice “Delete all sensors“, then “Uncover new sensors”.

Asterisk flashing means telemetry is updating.

Within the Modes tab, you MUST set AUX 1 as your arm change (AUX1 is at all times a 2-position change, designed particularly for arming in ExpressLRS).

Show LQ and RSSI in OSD
Additional Studying: What are LQ and RSSI?
In a nutshell:
- RSSI – Sign energy, how loud the sign is (worth from -130dBm to 0dBm)
- LQ – Hyperlink High quality, how nicely your receiver can perceive the sign (worth from 100% to 0%)
Each indicators are helpful, but when it’s a must to choose one, LQ might be extra necessary.
To show LQ correctly it is best to use the newest model of Betaflight (4.2 or newer), the place they launched a brand new RFMD:LQ% format for the LQ OSD ingredient.
- Within the Receiver tab, Disable RSSI_ADC, set RSSI Channel to Disable
- Within the OSD tab, allow Hyperlink High quality and RSSI in dBm
It’s helpful to have each measurements. For instance:
- Excessive LQ, excessive RSSI = wholesome radio hyperlink
- Low LQ, excessive RSSI = noisy RF atmosphere
- Excessive LQ, low RSSI = In case you are very far-off, warning is required as you’re approaching the top of vary; If the receiver may be very near the transmitter, that may be an indicator of antenna downside
- Low LQ, low RSSI = the top of vary, it is best to flip again as failsafe is more likely to occur
Antenna Mounting
My suggestion is to mount your RX antenna vertically if potential. You can too mount it horizontally should you solely fly brief vary. See this submit for extra element.
Setup Failsafe
Digital RC protocols sometimes comprises a failsafe flag within the information packet that the flight controller can detect routinely, so there’s no want for handbook setup on the radio. Nevertheless, it’s essential to assessment the Failsafe tab in Betaflight and decide what motion the drone ought to take within the occasion of a failsafe.
To make sure failsafe is working correctly, conduct a bench check. Take away all propellers, plug within the battery, arm the quad, and switch off the radio. The default failsafe settings in Betaflight ought to cease all motors from spinning inside a few seconds. Be ready to unplug the battery in case of any points.
ELRS LUA Script Settings
There are 3 fundamental settings it is best to know in ExpressLRS Lua script: Packet Price, Telem Ratio (telemetry ratio) and TX Energy.
TX Energy
Obtainable choices are: 25mW, 50mW, 100mW, 250mW, 500mW and 1W. Notice that with EU LBT firmware, the RF energy is proscribed to 100mW.
Some modules solely assist as much as 250mW, whereas some are able to as much as 1W. Assessments have proven that simply 2.4GHz at 100mW can obtain 33km vary, which may simply outperform most 5.8GHz video hyperlinks, so that you don’t at all times have to make use of the very best energy obtainable. To not point out greater energy consumption can considerably cut back radio battery life, and improve the danger of overheating with out correct cooling. With RF energy greater than 250mW, turning on the fan is advisable, so this by setting fan threshold to 250mW.
By enabling the choice Dynamic Energy, it permits the system to routinely regulate output energy based mostly on sign energy. Dynamic Energy makes use of SNR (sign to noise ratio) as an alternative of RSSI to find out energy as RSSI doesn’t issue within the noise flooring or if the receiver has an amplifier. This could probably save battery life as it’s going to decrease the ability when the receiver is shut by, it solely will increase energy when it’s wanted. In case you have Dynamic Energy on, MAX Energy would be the higher restrict.
The suitable energy stage to your FPV drone relies on the specified packet charge and vary. Operating ExpressLRS at 50Hz can present extraordinary vary, even at 100mW. Nevertheless, should you plan to make use of a better packet charge, like 500Hz, your vary can be considerably diminished, and chances are you’ll want extra output energy to take care of the identical vary. Familiarize your self with dB and you’ll carry out calculations utilizing receiver sensitivity and output energy to find out the vary distinction between varied packet charges and energy ranges, this may assist you decide. 250mW needs to be sufficient for most individuals flying inside a few miles of vary even at 500Hz, however after all greater energy gives you higher sign penetration too, not simply vary. Regardless the ability, in order for you essentially the most dependable hyperlink or wish to fly lengthy vary, it’s usually advisable to stay to a decrease packet charge akin to 50Hz because it gives greater sign sensitivity.
Packet Price
Packet charge is the variety of information packets transmitted per second. It’s a tradeoff between vary and latency, you simply can’t have each. Greater packet charge has decrease latency, however much less vary.
In ELRS V3, the packet charge modes obtainable are:
- 500Hz, 250Hz, 150Hz, 50Hz – These are the traditional modes, utilizing LoRa modulation which has longer vary and higher resistance to RF interference.
- F1000, F500 – These are F modes, or FLRC, they provide quicker modulation and decrease latency, however shorter vary than the traditional modes. It helps 500Hz and 1000Hz. Nice for racers. The F1000 mode has the bottom latency. It’s not about “really feel”, I doubt most individuals may even inform the distinction between 150Hz and 500Hz, however sending your command even simply 1ms quicker means you might react 1ms sooner which is essential when reacting to essential conditions like racing and may aid you to keep away from a crash.
- D500, D250 – These are D mode, or DVDA (Deja Vu Range Support), offers higher hyperlink connection in complicated interference atmosphere by sending the identical information packet a number of occasions to cut back the possibility of knowledge loss. D500 and D250 point out that the identical information packet is distributed twice and 4 occasions respectively. D mode retains your LQ excessive and stop probability of jitter at the price of barely greater latency. Nice for racing. It really works on the FLRC mode (F1000) subsequently vary can be lower than regular mode
- 333Hz Full, 100Hz Full – as much as 16 full decision (10-bit) channels in 100Hz and 333Hz packet charges. These are appropriate for mounted wings.
FLRC at 1000Hz is one of the best mode for racing, because it has the bottom latency. LoRa modes (regular mode) have one of the best vary. Slower replace charges have greater latency, however longer vary. FLRC D modes have diminished jitter, however greater latency than FLRC F modes. Notice that 500Hz or greater replace charges will not be obtainable in some radios, for instance the Tango 2 solely helps as much as 250Hz.
Telem Ratio
What’s telemetry?
Telemetry is a function generally obtainable in radio hyperlinks. It permits the receiver to ship information again to the radio, akin to battery voltage, sign hyperlink high quality, RSSI, GPS coordinates and so forth.
Telemetry is enabled by default in ExpressLRS, it sends radio hyperlink associated information like RSSI and LQ again to the radio. When you intent to make use of Telemetry to ship data about your drone again to the transmitter, akin to battery voltage, it’s a must to allow “Telemetry” function in Betaflight’s Obtain tab.
Telemetry Ratio in ExpressLRS settings is how typically telemetry information get despatched. A bigger quantity means slower telemetry replace, e.g. 1:8 means telemetry information is distributed each 8 frames, whereas 1:128 is each 128 frames (e.g. 1:8 is extra frequent replace than 1:128).
Extra frequent telemetry updates will improve latency to the management hyperlink, so you possibly can select to decrease telemetry charge and even disable it solely within the LUA script in order for you essentially the most constant management hyperlink. However I like to recommend having telemetry should you fly lengthy vary.
When you get “Telemetry misplaced” warnings whereas your hyperlink high quality remains to be trying good, it could possibly be that your telemetry ratio is about too low. Attempt growing Telem Ratio one step at a time till the “Telemetry Misplaced” warning stops.
Channels
What number of channels does ELRS assist? 9 to16 channels relying on packet charge and change mode.
For examples:
- At 500Hz or 1000Hz, in Hybrid or Broad change mode, you get 12 channels.
- At 100Hz or 333Hz, in Full Res 16CH, you get 16 channels.
The primary 4 channels are to your sticks – roll, pitch, throttle and yaw. These channels are 10-bit full decision and their instructions are despatched each transmission.
The remainder of the channels are AUX channels, sometimes used for switches on a radio.
The decision the channels are decided by the choice known as “Change Mode”. Greater decision channels lead to greater latency.
The primary AUX channel, AUX1 (channel 5) is designed for use for the arming change, and it’s at all times a 2-position channel (when OFF it sends 1000, when ON it sends 2000) regardless change mode (apart from Full Res 16ch Price/2).
Change Mode
Channel 1 to 4 are the management channels (roll, pitch, throttle and yaw) and are at all times 10-bit full decision. However for the remainder of the channels (AUX1-AUX8), these are usually used for switches and their decision relies on your necessities.
The Change Mode setting controls how the channels AUX1-AUX8 (channel 5 to 12) are despatched to the receiver, there are two choices: Hybrid and Broad.
With Hybrid change mode, the AUX channels will solely be 2- or 3-position, that is ideally suited for much less latency. Broad change mode makes your channels 64 or 128 place which gives greater than sufficient decision for many issues we wish to do.
For FPV drones, I usually suggest to make use of Broad change mode.
Gemini Mode (Antenna Mode)
Beginning with ExpressLRS 3.3, a brand new antenna mode generally known as “Gemini” has been launched. This mode is designed to boost the steadiness of knowledge transmission and reception by concurrently utilizing two completely different antennas and frequencies to transmit and obtain a single packet of knowledge.
Study extra about how Gemini mode work on this article: https://oscarliang.com/expresslrs-gemini/
Nevertheless, it’s necessary to notice that utilizing Gemini mode might result in elevated battery consumption within the radio.
You want each transmitter and a receiver which are appropriate with Gemini mode. Moreover, be sure that each gadgets are up to date to ExpressLRS model 3.3 or later. To activate Gemini mode, comply with these steps:
- Begin the ExpressLRS Lua script in your radio.
- Set the “Antenna Mode” to “Gemini”.
- Choose the receiver you’re binding with from the “Different Machine” menu.
- Set the “Rx Mode” to “Gemini”.
In case your receiver doesn’t assist Gemini mode, ensure that to modify to Ant1/Ant2 modes to keep away from interference.
The primary transmitter module that helps Gemini is the BetaFPV SuperG Nano Transmitter Module: https://oscarliang.com/betafpv-superg-nano-transmitter-module/
Antenna Mode Choices
| Transmitter Antenna Mode | Description |
|---|---|
| ANT1/ANT2 | Makes use of solely one of many two antennas for communication. |
| Change | Alternates communication between two antennas. |
| Gemini | Prompts Gemini mode for simultaneous use of two antennas on completely different frequencies. |
Further Receiver Settings
There are extra settings once you hook up with the receiver by way of WiFi (on the web page the place you flash RX firmware).

First, energy on the receiver and wait till it goes into WiFi hotspot mode. It does it routinely after being powered for 60 seconds by default (LED flashing quickly when it’s in WiFi mode). Or it’s also possible to power the receiver to enter WiFi mode within the radio’s LUA script.
Now, hook up with the WiFi community (the WiFi password is: expresslrs). In your browser, go to 10.0.0.1
On this web page, scroll down and one can find the extra settings like Mannequin Match. For PWM receivers, additionally, you will have settings like PWM Output and Failsafe Positions for every channel, and the choice to invert the channel outputs. These setting will not be but obtainable within the LUA script.
Efficiency Enhancement Settings
In Betaflight, it is best to apply the acceptable RC_Link preset for the actual packat charge you’re utilizing. Failure to take action will lead to issues with feedforward.
See my Betaflight Tuning information for more information.
Including House WiFi Community
It makes it a lot simpler to flash firmware once you setup “House WiFi Community” in ExpressLRS. Whenever you put your ELRS transmitter module or receiver in WiFi mode, it’s going to join routinely to your house WiFi community, then you definitely would be capable to flash firmware on a browser out of your pc. Simple!
To set it up, you first must flash your TX module and RX with “HOME_WIFI_SSID” and “HOME_WIFI_PASSWORD”. These are your house WiFi community title and password. Even in case you are already on the newest firmware, it’s a must to re-flash to let your transmitter module and receiver know your community login for this to work.

As soon as that’s performed, you possibly can activate WiFi mode. You are able to do this within the LUA script.
Open ExpressLRS Configurator, and it’ll routinely detect your ELRS gadget. Click on on DNS (elrs_tx.native or elrs_rx.native), or the IP tackle (192.168.0.XXX), if it doesn’t work simply attempt the opposite, one in all them ought to work.
This may convey you to the web page to add the firmware, similar as flashing utilizing the WiFi technique we lined earlier than.

Easy methods to Use Mannequin Match
Mannequin Match is a quantity you possibly can assign to a receiver, this lets you use a mannequin profile on the radio to solely management a selected receiver.
When you usually use one mannequin profile to regulate your whole fashions (as a result of they’re all utilizing the identical sort of radio receiver and setup the identical means) as an alternative of getting particular person profile for every mannequin, you in all probability don’t wish to use “mannequin match”. However mannequin match is helpful for fashions the requires trims, for instance for planes and wings.
To make use of mannequin match in ExpressLRS, go to Mannequin Setup in your radio, scroll all the way down to Inner RF (or Exterior RF in case you are utilizing an exterior ELRS module). In Receiver, set it to a novel Mannequin ID (any quantity between 0 and 63, on this instance, I’ll use 2).

Put your receiver in WiFi mode, go to the webpage configuration, Mannequin, and allow Mannequin Match. Set Mannequin ID to the identical quantity you entered in Mannequin Setup in your radio.

Go to ExpressLRS LUA script, and allow Mannequin Match.
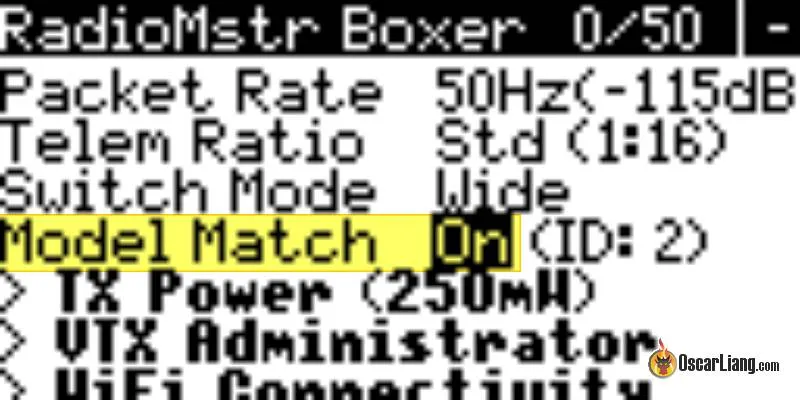
Now your receiver can solely discuss to this specific mannequin profile with Receiver ID 2. That’s it.
SPI Receiver
In case you have a SPI receiver, or a receiver that doesn’t have WiFi functionality, you possibly can set Mannequin ID in CLI. You may’t set the ID by simply rebinding whereas mannequin match is on, so i needed to go to betaflight CLI and enter:
get expresslrs_model_id
to indicate me its ID and that i needed to:
set expresslrs_model_id = "your ID quantity"
Easy methods to Output SBUS
ExpressLRS receivers by default output CRSF sign, which requires 2 wire connections (TX and RX). Nevertheless you might configure your receiver to output SBUS which solely wants 1 wire, comply with tutorial right here: https://oscarliang.com/how-to-output-sbus-from-an-expresslrs-receiver/
SBUS is an outdated and sluggish protocol and doesn’t assist telemetry, subsequently I wouldn’t suggest it except it’s the one protocol you need to use along with your flight controller.
Initialization Price
Whenever you change on the receiver, there could also be a delay of some seconds whereas the receiver tries completely different packet charges till a match is discovered with the transmitter. The delay will rely on the packet charge – the slower the speed, the larger the delay.
When you at all times transmit on the similar packet charge, you possibly can cut back the delay by doing this: Open LUA script, choose Different Units, choose your receiver and set Initialization Price to the speed you at all times use. After that, connection can be just about prompt once you energy on the transmitter and receiver.
EdgeTX Telemetry Low/Crucial Alarms
EdgeTX and OpenTX use hyperlink high quality (RQly telemetry) as an alternative of RSSI for the low/essential alerts. Advisable thresholds are 50% for low alarms and 20% for essential alarms. You may enter these values within the Telemetry web page of your radio.
Configurations For Mounted Wings
These settings could be ideally suited for mounted wings with out a flight controller or stablizer (if the receiver is related on to servos and ESC).
Utilizing Full Modes
In Packet Price, use both 100Hz Full or 333Hz Full.
These modes present full 10-bit decision (1024 positions) for all channels which is essential for exact management if you wish to drive servos and ESC straight from a PWM receiver. Between 100Hz and 333Hz full modes, there’s a commerce off between vary and latency. 100Hz is healthier for vary whereas 333Hz is healthier for latency.
You then additionally wish to determine which change mode you wish to use, the choices are:
- 8 Channel (1 to 4 and 6 to 9 are despatched 10bit full charge).
- 16 Channel (all channels despatched 10 bit however half charge).
- 12 Channel blended (1 to 4 are 10 bit full charge, 6 to 13 are 10bit however half charge).
For many fixed-wing fashions, 333Hz Full with 8-channel change mode gives a super stability, guaranteeing every channel is up to date with every transmission for the bottom latency and highest decision. The 16-channel choice may be tempting nevertheless it does introduce extra delay as channels are despatched alternately (half charge).
Notice: The entire change modes use CH5 for arming, which has solely two positions. Channel 5 have to be excessive for the system to transition from standby to lively mode. This requirement may be seamlessly built-in into fixed-wing configurations through the use of a throttle lower change to regulate each the throttle and Channel 5’s state. This strategy not solely simplifies setup but additionally ensures your mannequin is able to fly when you’re, with out losing a channel on the receiver. I’ve a tutorial on how you can setup a throttle lower change right here: https://oscarliang.com/setup-arm-switch-for-wing-no-fc/
Remap PWM Receiver Outputs
Trendy PWM receivers supply the pliability to remap output channels. Given the present requirement of holding Channel 5 excessive throughout flight, it’s sensible to take away Channel 5 from the output mapping in a hard and fast wing with out an FC, guaranteeing no output is wasted.
Setup Failsafe
You may setup failsafe within the WebUI by assigning a predefined worth to every channel when the radio hyperlink is misplaced. It’s necessary to make sure the throttle is about to low in failsafe so your mannequin will glide to a protected touchdown.
FAQ
What’s ExpressLRS TX BackPack?
The TX Backpack is an elective function inside the ExpressLRS ecosystem. It permits wi-fi management of FPV-related gadgets straight out of your radio transmitter. As an illustration, you possibly can conveniently regulate the channel of your analog FPV goggles utilizing the radio management.
To make the most of TX Backpack, each the ExpressLRS transmitter and the gadget being managed have to be outfitted with an ESP8285 chip. This chip, integral to the performance, is what we seek advice from because the “TX Backpack.”
Ideas for Lengthy Vary
- Set the very best legally potential transmit energy
- Choose a decrease replace charge, e.g. 50Hz can have higher vary than 500Hz on the similar energy
- Select a real variety receiver with PA and LNA functionality
- Use high-quality antennas in your receiver, ideally half-wave dipole (T-shaped) ones. Keep away from utilizing ceramic antenna for lengthy vary
- Optimize antennas placement as defined right here: https://oscarliang.com/antenna-positioning/
- Get a better acquire antenna to your transmitter
- Think about using 900Mhz as an alternative of two.4Ghz for final lengthy vary. (2.4GHz remains to be very succesful although)
- For extra tips about lengthy vary take a look at my tutorial: https://oscarliang.com/long-range-fpv-flying-mini-quad/
Unable to make use of F1000 packet charge or prompts “Baud charge is simply too low”
F1000 requires a baud charge greater than 400K, and the radio transmitter’s baud charge is 400K by default.
First replace the baud charge (larger than 400K) setting within the {Hardware} in Radio Setup menu, then restart the radio transmitter to make sure the baud charge setting has been utilized. Then change the Packet charge.
In case your radio don’t assist greater baudrate then your can’t run F1000 mode.
When the F1000 is turned on, packet charge is lower than 1000
This could possibly be attributable to outdated EdgeTX model. You must replace to 2.8.0 or newer.
Identical radio controlling a number of receivers concurrently
What occurs should you energy up a number of drones which are all sure to the identical radio?
You may management all of those drones on the similar time, however telemetry received’t work correctly as all of them making an attempt to ship telemetry again to the radio and they’ll intrude with one another.
To keep away from this from taking place, you might use mannequin match (every receiver would require an distinctive ID and a separate mannequin profile). See “Easy methods to Use Mannequin Match” on this information for directions how you can set it up.
Why Does My Radio Maintain Saying “Telemetry Misplaced”?
Often, you may get a warning out of your radio saying “Telemetry misplaced,” but nonetheless retain full management and a superbly positive video hyperlink. So, what’s the explanation behind this?
Your ExpressLRS radio hyperlink is bi-directional, that means your receiver is just not solely receiving indicators but additionally transmitting them. Whereas some transmitters in radios can output as much as 1000mW, receivers sometimes have a a lot decrease energy output, often round 25mW. Some newer receivers may attain as much as 100mW, however that is nonetheless significantly decrease than the transmitter.
A normal rule of thumb is that 4 occasions the transmission energy doubles the vary. In keeping with this, 1000mW would have 2.6 occasions the vary of 25mW. To be taught extra about FPV vary, take a look at this text: https://oscarliang.com/calculate-fpv-range
Provided that the receiver has a a lot shorter vary than the transmitter, when your transmitter isn’t receiving information from the receiver, you’ll hear the fixed “telemetry misplaced” warning. It’s often not a difficulty so long as you continue to preserve full management of the plane. It merely signifies that you simply’re not receiving telemetry information, which isn’t important for sustaining a management hyperlink. Nevertheless, remember that your transmitter depends on telemetry for sure options, akin to dynamic energy. If telemetry is weak, your transmitter may unnecessarily use most energy, although much less energy may suffice for reaching the receiver.
If you wish to remove this annoying warning, contemplate the next solutions:
- Improve to a receiver with greater telemetry energy (presently, the very best is 100mW).
- Flip off the telemetry warning in your radio’s settings.
- Set Telemetry Ratio to straightforward, or a decrease ratio may assist
Lua Script simply retains Loading, Can’t Enter
When your run the ExpressLRS LUA script and “loading…” seems on the display and nothing else occurs, ensure you have enabled Inner RF (or Exterior RF in case you are utilizing an exterior module).
Ensure you have the newest model, if unsure, flash your module once more and obtain the newest LUA script.
The baud charge of the radio transmitter is about under 400K in radio setup, and it needs to be adjusted to a better baudrate worth. If there is no such thing as a choice to change the baud charge, be sure that EdgeTX is at model V2.7.0 or newer.
“Dangerous Measurement Given” Error
V2 and V3 handles partition in another way (as they moved in the direction of unified goal), so once you flash V3 firmware to your module with V2 firmware, the file measurement get tousled and also you get “Dangerous Measurement Given” error.
The repair is to obtain “repartitioner.bin“, on WiFi web page, add this file as an alternative of firmware file. It’s going to say goal mismatch, choose flash anyway.
Now flash the V3 firmware once more, it ought to undergo this time.
Receiver Replace Warning: ”Not sufficient information uploaded!“
When you attempt to flash firmware of a unique goal, and power replace, you’re going to get this error “Not sufficient information uploaded”.
It’s a bug/function in ELRS 2.5 that stops goal altering. When you nonetheless wish to go forward and flash a unique goal, you first must revert the RX firmware again to 2.0 (on the unique goal), then flash the completely different goal you would like.
LUA script solely reveals “Connecting…”
That’s a sign of the ExpressLRS TX module is just not speaking to the LUA script
Doable causes of the issue:
- TX Module is put in, or is put in incorrectly (pins within the module bay do not make correct contact or damaged)
- Possibly the TX module is in WiFi replace mode, restart the radio and take a look at once more
- Ensure you have set RF protocol to CRSF
- In case you are working OpenTX, ensure that the model is just not too outdated (it needs to be 2.3.12 or after)
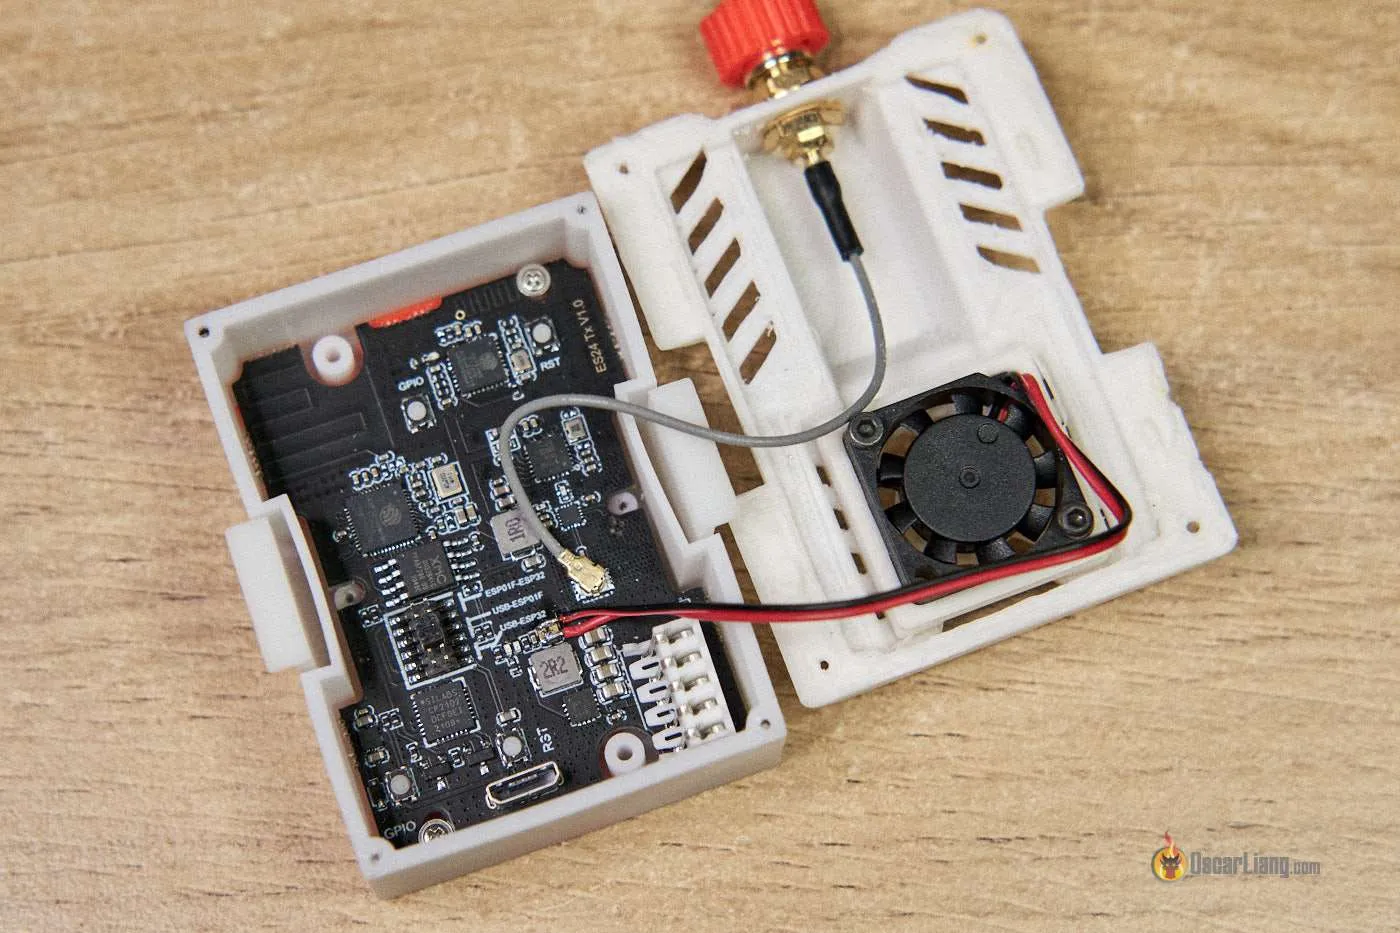
Easy methods to Set up Cooling Fan on Happymodel TX Module
There isn’t a fan plug for the Happymodel 2.4GHZ TX module, you could solder it straight. I discovered 3.3V and GND at this capacitor. Ensure you affirm voltage with a multimeter earlier than connecting to keep away from damaging the board.

Inconsistent Packet Price – CRSFShot Not Working
Within the ELRS lua script prime bar, there may be an indicator (e.g. 0:200) which tells you what number of packets per second it’s getting from the radio. You should use it to verify the consistency of the RC hyperlink.
Ideally it ought to at all times present a steady quantity that’s the similar because the packet charge you choose. For instance: 0:50, 0:150, 0:250, 0:500.
If it reveals an inconsistent quantity like 0:63, or is caught at 0:250 at each packet charge you choose, then your radio doesn’t have CRSFShot working correctly.
The newest official launch of OpenTX (2.3.12 or newer) already consists of CRSFShot, so double examine in case your OpenTX model is outdated.
Utilizing ExpressLRS Emblem as Mannequin Picture
![]()
I made a brand you need to use as mannequin picture within the TX16S/T16. You may discover ways to use it right here.
Picture obtain: google drive.
Set up USB to UART Driver
You may or won’t want to put in this driver in your PC if you wish to replace your TX by way of UART: https://www.silabs.com/builders/usb-to-uart-bridge-vcp-drivers
Taranis QX7
For Taranis QX7 customers, in case you are working OpenTX, you’ll must carry out this mod with a view to run 400k baud charge in your radio. It’s not wanted, however it is suggested if you wish to get essentially the most out of ELRS: https://www.youtube.com/watch?v=mHfQe05XJn8&ab_channel=edrone
When you run EdgeTX you received’t want to do that mod because the bug has been addressed in software program.
Edit Historical past
- Jun 2021 – Up to date information: OpenTX 2.3.12 has been launched, not must flash nightly
- Jul 2021 – Up to date: ExpressLRS 1.0 official launch
- Aug 2021 – Added data for BetaFPV ELRS Nano TX and RX
- Nov 2021 – Up to date product checklist
- Feb 2022 – Up to date the whole TX, RX and antenna choices presently obtainable in the marketplace
- Might 2022 – Up to date directions for model 2.5, added data about including residence community, up to date screenshot of LUA script (V2)
- Oct 2022 – Up to date information for ELRS V3 launch, added PWM receiver merchandise
- Mar 2023 – Added data about mannequin match, added extra FAQ, up to date product hyperlinks
- Mar 2024 – ELRS 3.3 replace, new merchandise.
[ad_2]